


Showing posts with label tutorial. Show all posts
Showing posts with label tutorial. Show all posts
Tuesday, February 2, 2010
How to Make a Covered Button & a ponytail holder (Video)
I finally made a video of how to make a cover button ..... ahhh! Also, I will show you how to make a ponytail holder with the covered button! Here you go:

Sunday, January 31, 2010
How to Make a Covered Button Bracelet
 Hi! Making a covered button bracelet is super easy! You can finish making a beautiful bracelet in 15 minutes! It's a great project to do it with kids and teenagers too! I made this blue bracelet with bumble bees & flowers for my daughter. She loves it!!
 Step 1:
 You'll need these materials: buttons to cover (I use size 24 [5/8" or 1.6cm] here),
a coordinating cover button tool, a bracelet, fabric,
a small piece of felt (it's not in this picture), a E6000 glue, a stick or a toothpick.
 Step 2:
Cut a piece of fabric with the pattern you like in the center.
It should be big enough to cover a button.
 Step 3:
 Because my cover button is a wire eye back (loop/shank),
so I need a pair of pliers to remove the loop out. It's super easy!
 Step 4:
 Put the piece of fabric on top of the mold (white one), then put the shell of the button on top. Push down and tuck the fabric in the center. Place the back of the button on top of it.
(click here to see step by step tutorial of making a covered button).
 Step 5:
 Push the pusher (blue one) down.
 Step 6:
 Da Da! It's done!
 Step 6:
 A covered button is made
 Step 7:
  Step 8:
 Step 7:
 Cut a piece of felt as big as the back of the button.
It helps to increase the thickness of the button back which is easier to attach to the bracelet.
 Step 8:
 Apply the E6000 glue onto the bracelet disks and glue the covered buttons on.
It takes about 5 minutes to dry.
 Da Da! It's done!
 NEED THESE SUPPLIES? PLEASE VISIT MY SHOPS AT:
or
Saturday, August 29, 2009
How to make Ear Wire Earrings?
Do you want to make your own designed earrings? Don't think that it's difficult and let it stop your creativity. Here is a tuturial demonstration of making ear wires (French hook earrings). It's easy and so much fun!
 First of all, you need the tools (round nose pliers, a side cutter & needle-nose pliers-sorry, the needle nose pliers is not showed in this picture), beads (I have 5mm, 3mm & glass beads) and earring findings (2 head pins, 2 eye pins & 2 French hooks) . In this demonstration, I will make earrings with 2 sections each. This picture shows the layout and order of the design.
 We'll work on the bottom section first. Arrange beads onto the head pin following the design of the above picture. Then use a pair of needle-nose pliers (here you go!) to bend it over to make a 90 degree angle.
 Then cut off excess head pin with the side cutter. Leave approximately 1/4 inch.
 Grab the end of the head pin with a pair of round nose pliers and make a loop. But don't close the loop yet because we need to put the eye pin into it to make the top section of the earring.
 Now, put the eye pin into the loop. Then use the round nose pliers to make a closed loop.
 Again, arrange the beads onto the eye pin following the designed on the first picture.
 Then cut off the excess eye pin leaving approximately 1/4 inch. Use the round-nose pliers to make a loop. Before you close the loop, remember to put the french hook into the loop.
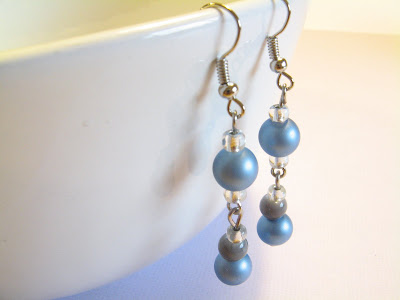
 A beautiful ear wire is finished. Follow the above instruction to make the second piece.


 First of all, you need the tools (round nose pliers, a side cutter & needle-nose pliers-sorry, the needle nose pliers is not showed in this picture), beads (I have 5mm, 3mm & glass beads) and earring findings (2 head pins, 2 eye pins & 2 French hooks) . In this demonstration, I will make earrings with 2 sections each. This picture shows the layout and order of the design.
Check out my shop for fench hook earring findings.
 We'll work on the bottom section first. Arrange beads onto the head pin following the design of the above picture. Then use a pair of needle-nose pliers (here you go!) to bend it over to make a 90 degree angle.
 Then cut off excess head pin with the side cutter. Leave approximately 1/4 inch.
 Grab the end of the head pin with a pair of round nose pliers and make a loop. But don't close the loop yet because we need to put the eye pin into it to make the top section of the earring.
 Now, put the eye pin into the loop. Then use the round nose pliers to make a closed loop.
 Again, arrange the beads onto the eye pin following the designed on the first picture.
 Then cut off the excess eye pin leaving approximately 1/4 inch. Use the round-nose pliers to make a loop. Before you close the loop, remember to put the french hook into the loop.
 A beautiful ear wire is finished. Follow the above instruction to make the second piece.
Need french hooks? Check ou my stores here!


Subscribe to:
Posts (Atom)